A couple of days ago I got an idea to do a barn scene on canvas, made from paper. It was a great idea, in theory, but I had no idea how to make a barn.
Essentially, I knew it would start with a drawing, because for me, a drawing provides guidelines. I thought I’d share the steps I took, in case you’d like to try it, too.
STEP ONE:
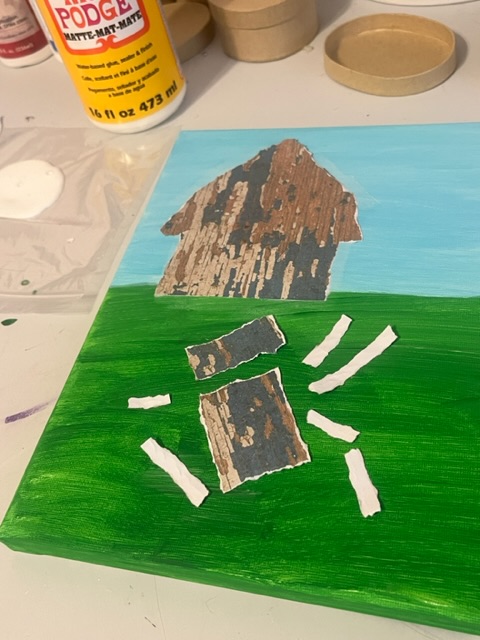
Paint a canvas. I used an 8×10 inch wrapped canvas and I painted grass and a sky. (This isn’t the exact one I used- I forgot to take a picture of that one.)

background for the barn
STEP TWO:
Draw a simple barn to use as a reference. I looked at easy drawing tutorials, then drew mine.

an idea of the style you like
STEP THREE:
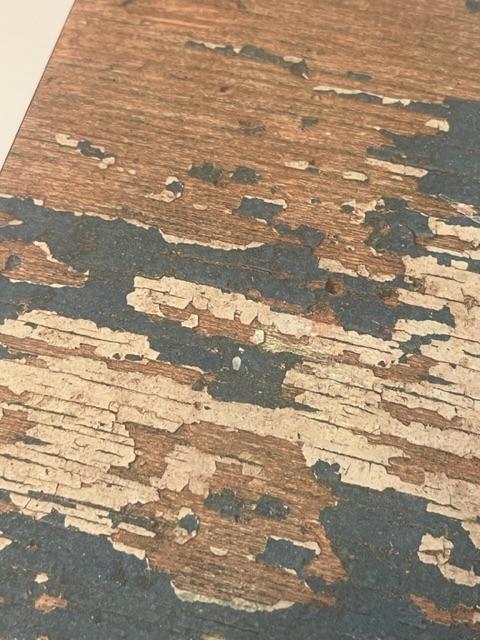
Choose a scrapbook paper for your barn. I chose a blue and gray weathered board paper.
STEP FOUR:
Draw the basic barn outline on the back of the scrapbook paper.

STEP FIVE:
Either tear out or cut the barn from the scrapbook paper. I chose to tear mine out because I wanted a vintage, layered look.
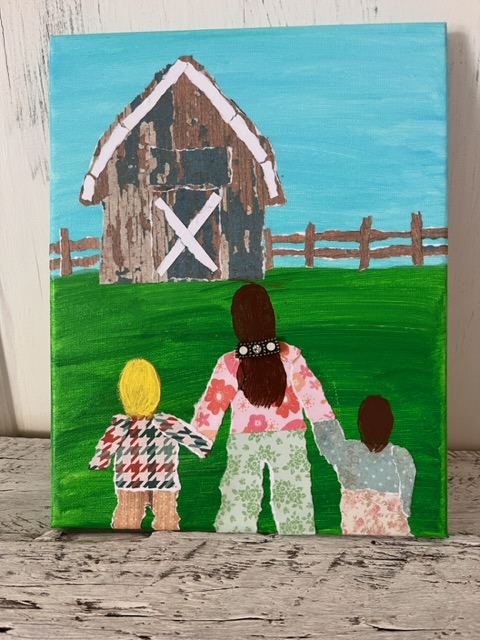
Also, now is a good time to look back at your first drawing so you can tear out/cut out any doors, windows, and trim for your barn. Here’s my barn with trim pieces:
STEP SIX:
Glue your barn to the canvas using a decoupage medium. I used Mod Podge and applied the glue with a foam brush.
It’s helpful to put the glue on the canvas and the back of the scrapbook paper. Lay the barn onto the canvas and put another layer of glue on top of the barn.
Tips:
- You may have to use your fingers to get any wrinkles out of the paper- it’s ideal if it dries flat.
- Also, if you bring the glue all the way across the canvas every time you add pieces, it helps the glue look uniform after everything is added and the glue dries.

STEP SEVEN:
Glue in more details if you’d like. I started by adding a paper fence.

for the barn scene
I wanted to have a momma walking to the barn. I ended up putting two kiddos with her.
details you’d like in your scene
I thought paper flowers would look pretty, so I tore them out of some scrapbook paper I have. I added them the same way, with the glue and foam brush.

STEP EIGHT:
Add the jewelry. I wanted something small and simple. So I chose part of a bracelet for the momma’s barrette. I also picked three tiny hearts that were part of another bracelet to add near the flowers. One of them says, ‘live, love, laugh.’ Pretty fitting.
I use a nontoxic craft glue for adding jewelry to a canvas.

What a fun project! When I started yesterday morning I had zero idea how to even make a barn with paper. I love how it turned out. Collage is really great because we can just add things as we go.
Thanks for being here and for reading. If you decide to try barn collage jewelry art, please let me know! I’d love to see it!
Jessica
©️ COPYRIGHT 2023 JEWELED AGAIN BY JESSICA -ALL PHOTOGRAPHS TAKEN BY ME- ALL RIGHTS RESERVED


15 responses to “Barn Collage Jewelry Art”
I love this~ x F.
LikeLiked by 1 person
Hiiiii!!! Maybe I ought to try the Rabbit Patch!
LikeLike
You’re so creative. It’s fun for me to see the progression of your piece.
LikeLiked by 1 person
Hey pen pal! Thanks so much. It was fun showing the steps. From painted canvas to a scene is quite something. Even showed my kiddo the difference some paper and glue can make.
LikeLiked by 1 person
Just mailed you a letter!!
LikeLiked by 1 person
Yay. Can’t wait. Maybe it’ll be there when I get back home. Spending some time at Mom and Dad’s house helping out.
LikeLiked by 1 person
Oh, you are? I’ve been wondering about them.
LikeLiked by 1 person
So cute! The choice of the weathered wood paper for the barn was genius.
LikeLike
Aww- thanks! Love those paper pads with vintage stuff.
LikeLiked by 1 person
This turned out great, Jess! Awesome work.
LikeLiked by 1 person
Hi. I appreciate that very much! Thank you!
LikeLiked by 1 person
I love that weathered barn paper–maybe I should just decoupage it on my walls! Seriously, though, the barn turned out really nice. If this was my dad’s barn, his horse Rio would be sticking his head over the fence waiting for those girls to bring him a treat. 💕
LikeLiked by 1 person
Hi! Isn’t that paper so cool?? If you did your walls in it, I’d have to see!!! Oh my goodness- I didn’t know your dad had a horse. How sweet. LOVE horses. I can just imagine them running over (because who can walk while a horse is waiting?) and giving Rio a treat! Super smile here. That just topped off the whole piece! Thank you for that! ❤️
LikeLiked by 1 person
The 7 years of helping with dad’s caregiving, when I was there my job was taking care of Rio. He was an awesome horse and he followed me around the pasture when I was working in it.
LikeLiked by 1 person
Aww! He really sounds like a sweet horse. Love that that was your job. Love that you helped with your dad’s caregiving, too. ❤️
LikeLiked by 1 person